How to create clone record using JavaScript in MS Dynamics 365 and Open it in New Window
Create Clone/Copy record using JavaScript in MS Dynamics 365 and Open it in New Window.
Recently, I got a requirement from client where they wanted to clone the record and Open that into new window after saving the existing record. As usually I researched online for a way to clone/copy the record and open it but I was not able to find a good approach to do it. I have written some JavaScript code with the help of multiple articles so thought to share it with you guys so anyone has same type of requirement so they can build the solution for their client.
Everyone get troubled with writing huge codes and end up spending our valuable time for cloning/copying Dynamics CRM entity record. So in this blog I am going to explain the JavaScript code step by step.
Also Visit - Online Taiyari - Best Online Preparation and Mock Test for Government Exams
I had requirement to copy the record when user click on the Save and New button. So i have worked on the Phone Call Entity to save the record first then get the values of the fields and open them in new record.
First you have to add the ribbon workbench to create the New custom button which will call the JavaScript code on click. You can download the ribbon workbench from here. You will get the downloadable link in your inbox/spam folder.

Also Read - How to get and Set the Lookup Fields in MS Dynamics 365.
Also Read - How to change the Status (StateCode) field value in MS Dynamics 365 using JavaScript.
Lets check how to import the ribbon Workbench first -
Navigate to the Solutions.

and then Click on the Advanced Settings and then Click on the Solution. follow the images for reference.

Then Click on the Import Icon from the Solution bar.

New window will open. Select the Zip file of the Ribbon Workbench and click on the Next.

In the Next Window you have to click on the finish.
Also Read - How to connect SharePoint using PHP
Then go Back to Solution Page again and Refresh the page if Ribbon Workbench button is not showing. (In some cases you will need to close the window and again navigate to the Solution page back.)


Now Create a New Solution so you can work on the Ribbon Workbench. And then click on the Ribbon Workbench Button it will open the New window. In dialog box please select the correct Solution and Click on the OK button.

It will take some time and then Open the Solution. There should be a button Name Save and New. or if you want to create custom button then you can create it.

Also Read - How to connect Quickbooks Online using Microsoft Flow
Also Read - How to connect Tsheets using Microsoft Flow Custom Connector
Now We will go back to the JavaScript portion. In my case I have used Phone Call Entity. First I have used the SaveAndNew funtion to save the Existing Record on the Click of Save and New Button.
function SaveAndNew() {
Xrm.Page.data.save().then(OpenNewForm, function () { });
}
and in the same function I have also mention to run the New function. [OpenNewForm].
function OpenNewForm(){
//Get the Call To Lookup Field
if (Xrm.Page.data.entity.attributes.get("to").getValue() != null){
var toByID = Xrm.Page.data.entity.attributes.get("to").getValue()[0].id;
var toByName = Xrm.Page.data.entity.attributes.get("to").getValue()[0].name;
var toByType = Xrm.Page.data.entity.attributes.get("to").getValue()[0].entityType;
}
//Get the Call From Lookup Field
if (Xrm.Page.data.entity.attributes.get("from").getValue() != null){
var fromByID = Xrm.Page.data.entity.attributes.get("from").getValue()[0].id;
var fromByName = Xrm.Page.data.entity.attributes.get("from").getValue()[0].name;
var fromByType = Xrm.Page.data.entity.attributes.get("from").getValue()[0].entityType;
}
//Get the Regarding Lookup Field
if (Xrm.Page.data.entity.attributes.get("regardingobjectid").getValue() != null){
var regardingByID = Xrm.Page.data.entity.attributes.get("regardingobjectid").getValue()[0].id;
var regardingByName = Xrm.Page.data.entity.attributes.get("regardingobjectid").getValue()[0].name;
var regardingByType = Xrm.Page.data.entity.attributes.get("regardingobjectid").getValue()[0].entityType;
}
//Get the Text Fields
var subject = Xrm.Page.data.entity.attributes.get("subject").getValue();
var phoneNumber = Xrm.Page.data.entity.attributes.get("phonenumber").getValue();
var currentUser = Xrm.Page.context.getUserName();
var dateFieldValue= Xrm.Page.getAttribute('scheduledend').getValue();
var year = dateFieldValue.getFullYear();
var month = dateFieldValue.getMonth();
var day = dateFieldValue.getDate()+1;
var dueDate = year + "-" + month + "-" + day;
var parameters = {};
// For the Lookup fields
if (toByID != null && toByName != null){
parameters["to"] = [{id : toByID , name : toByName, entityType : toByType}];
}
if (fromByID != null && fromByName != null){
parameters["from"] = [{id : fromByID , name : fromByName, entityType : fromByType}];
}
if (regardingByID != null && regardingByName != null){
parameters["regardingobjectid"] = [{id : regardingByID , name : regardingByName, entityType : regardingByType}];
}
//For the text/Number Fields
if(subject != null){
parameters["subject"] = subject;
}
if(phoneNumber != null){
parameters["phonenumber"] = phoneNumber;
}
//Check the Owner Field
if(currentUser != null){
parameters["ownerid"] = currentUser;
}
if(dueDate != null){
parameters["scheduledend"]= dueDate;
}
//Get the parameters and Open the entity
Xrm.Utility.openEntityForm("phonecall", null, parameters)
}
So, Let me explain the code a little, First I have tried to get the Lookup fields value as you are aware that Lookup fields are not same as text fields so we have to get the Fields GUID (ID), Logical Name (Name) and the Entity Type (entityType) of the field. and then I have tried to get the text and Number fields value.
In the Code, I am getting the Current User for the Owner because my client wanted to change the Owner to Logged in user. Then I am getting the Due Date and incrementing to that to +1 day.
After getting all the fields (If you want to get the other fields like Description etc then you can use the same code and change the Names according) I am setting them to a Array variavble (Parameters).
and In the Last line I have added the Line to open the Form and then mentioning the Entity Name and passing the Parameters.
Also Read - How to sync custom Fields in Outlook from SharePoint
Also Visit - Online Taiyari - Best Online Preparation and Mock Test for Government Exams
Now you have to create a Web Resource in your Solution. To create Web Resource you have to Navigate to Solution and then click on the Web Resources

and then click on the New Button, New window will open. Choose the Name, Display Name, and Type (Script(JScript)). Click on the Text Editor and Paste the your code or Choose the File from your computer. Please do not forgot to SAVE and PUBLISH it.

Now go back to Ribbon Workbench solution and add this JavaScript Web resource to the button's Command.
As You can see the below Image I have created the New command and then added the newly created JScript file and then mentioned the function name (SaveAndNew).

and then I have added this command to the button.

Now Click on the Publish button. And then go back to the Phone Call Entity and create a record. Please Refer to the Below Images.
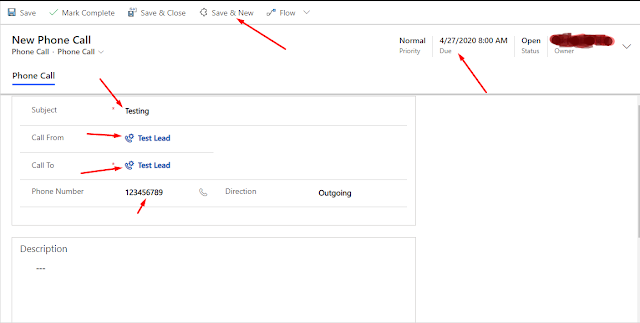
After Clicking on the Save and New Button

If you find this blog post helpful then Please share it with your friends on Social media. Thank you.
Recently, I got a requirement from client where they wanted to clone the record and Open that into new window after saving the existing record. As usually I researched online for a way to clone/copy the record and open it but I was not able to find a good approach to do it. I have written some JavaScript code with the help of multiple articles so thought to share it with you guys so anyone has same type of requirement so they can build the solution for their client.
Everyone get troubled with writing huge codes and end up spending our valuable time for cloning/copying Dynamics CRM entity record. So in this blog I am going to explain the JavaScript code step by step.
Also Visit - Online Taiyari - Best Online Preparation and Mock Test for Government Exams
I had requirement to copy the record when user click on the Save and New button. So i have worked on the Phone Call Entity to save the record first then get the values of the fields and open them in new record.
First you have to add the ribbon workbench to create the New custom button which will call the JavaScript code on click. You can download the ribbon workbench from here. You will get the downloadable link in your inbox/spam folder.

Also Read - How to get and Set the Lookup Fields in MS Dynamics 365.
Also Read - How to change the Status (StateCode) field value in MS Dynamics 365 using JavaScript.
Lets check how to import the ribbon Workbench first -
Navigate to the Solutions.

and then Click on the Advanced Settings and then Click on the Solution. follow the images for reference.

Then Click on the Import Icon from the Solution bar.

New window will open. Select the Zip file of the Ribbon Workbench and click on the Next.

In the Next Window you have to click on the finish.
Also Read - How to connect SharePoint using PHP
Then go Back to Solution Page again and Refresh the page if Ribbon Workbench button is not showing. (In some cases you will need to close the window and again navigate to the Solution page back.)

Now Create a New Solution so you can work on the Ribbon Workbench. And then click on the Ribbon Workbench Button it will open the New window. In dialog box please select the correct Solution and Click on the OK button.

It will take some time and then Open the Solution. There should be a button Name Save and New. or if you want to create custom button then you can create it.

Also Read - How to connect Quickbooks Online using Microsoft Flow
Also Read - How to connect Tsheets using Microsoft Flow Custom Connector
Now We will go back to the JavaScript portion. In my case I have used Phone Call Entity. First I have used the SaveAndNew funtion to save the Existing Record on the Click of Save and New Button.
function SaveAndNew() {
Xrm.Page.data.save().then(OpenNewForm, function () { });
}
and in the same function I have also mention to run the New function. [OpenNewForm].
function OpenNewForm(){
//Get the Call To Lookup Field
if (Xrm.Page.data.entity.attributes.get("to").getValue() != null){
var toByID = Xrm.Page.data.entity.attributes.get("to").getValue()[0].id;
var toByName = Xrm.Page.data.entity.attributes.get("to").getValue()[0].name;
var toByType = Xrm.Page.data.entity.attributes.get("to").getValue()[0].entityType;
}
//Get the Call From Lookup Field
if (Xrm.Page.data.entity.attributes.get("from").getValue() != null){
var fromByID = Xrm.Page.data.entity.attributes.get("from").getValue()[0].id;
var fromByName = Xrm.Page.data.entity.attributes.get("from").getValue()[0].name;
var fromByType = Xrm.Page.data.entity.attributes.get("from").getValue()[0].entityType;
}
//Get the Regarding Lookup Field
if (Xrm.Page.data.entity.attributes.get("regardingobjectid").getValue() != null){
var regardingByID = Xrm.Page.data.entity.attributes.get("regardingobjectid").getValue()[0].id;
var regardingByName = Xrm.Page.data.entity.attributes.get("regardingobjectid").getValue()[0].name;
var regardingByType = Xrm.Page.data.entity.attributes.get("regardingobjectid").getValue()[0].entityType;
}
//Get the Text Fields
var subject = Xrm.Page.data.entity.attributes.get("subject").getValue();
var phoneNumber = Xrm.Page.data.entity.attributes.get("phonenumber").getValue();
var currentUser = Xrm.Page.context.getUserName();
var dateFieldValue= Xrm.Page.getAttribute('scheduledend').getValue();
var year = dateFieldValue.getFullYear();
var month = dateFieldValue.getMonth();
var day = dateFieldValue.getDate()+1;
var dueDate = year + "-" + month + "-" + day;
var parameters = {};
// For the Lookup fields
if (toByID != null && toByName != null){
parameters["to"] = [{id : toByID , name : toByName, entityType : toByType}];
}
if (fromByID != null && fromByName != null){
parameters["from"] = [{id : fromByID , name : fromByName, entityType : fromByType}];
}
if (regardingByID != null && regardingByName != null){
parameters["regardingobjectid"] = [{id : regardingByID , name : regardingByName, entityType : regardingByType}];
}
//For the text/Number Fields
if(subject != null){
parameters["subject"] = subject;
}
if(phoneNumber != null){
parameters["phonenumber"] = phoneNumber;
}
//Check the Owner Field
if(currentUser != null){
parameters["ownerid"] = currentUser;
}
if(dueDate != null){
parameters["scheduledend"]= dueDate;
}
//Get the parameters and Open the entity
Xrm.Utility.openEntityForm("phonecall", null, parameters)
}
So, Let me explain the code a little, First I have tried to get the Lookup fields value as you are aware that Lookup fields are not same as text fields so we have to get the Fields GUID (ID), Logical Name (Name) and the Entity Type (entityType) of the field. and then I have tried to get the text and Number fields value.
In the Code, I am getting the Current User for the Owner because my client wanted to change the Owner to Logged in user. Then I am getting the Due Date and incrementing to that to +1 day.
After getting all the fields (If you want to get the other fields like Description etc then you can use the same code and change the Names according) I am setting them to a Array variavble (Parameters).
and In the Last line I have added the Line to open the Form and then mentioning the Entity Name and passing the Parameters.
Also Read - How to sync custom Fields in Outlook from SharePoint
Also Visit - Online Taiyari - Best Online Preparation and Mock Test for Government Exams
Now you have to create a Web Resource in your Solution. To create Web Resource you have to Navigate to Solution and then click on the Web Resources

and then click on the New Button, New window will open. Choose the Name, Display Name, and Type (Script(JScript)). Click on the Text Editor and Paste the your code or Choose the File from your computer. Please do not forgot to SAVE and PUBLISH it.

Now go back to Ribbon Workbench solution and add this JavaScript Web resource to the button's Command.
As You can see the below Image I have created the New command and then added the newly created JScript file and then mentioned the function name (SaveAndNew).

and then I have added this command to the button.

Now Click on the Publish button. And then go back to the Phone Call Entity and create a record. Please Refer to the Below Images.

After Clicking on the Save and New Button

If you find this blog post helpful then Please share it with your friends on Social media. Thank you.
Comments
Post a Comment